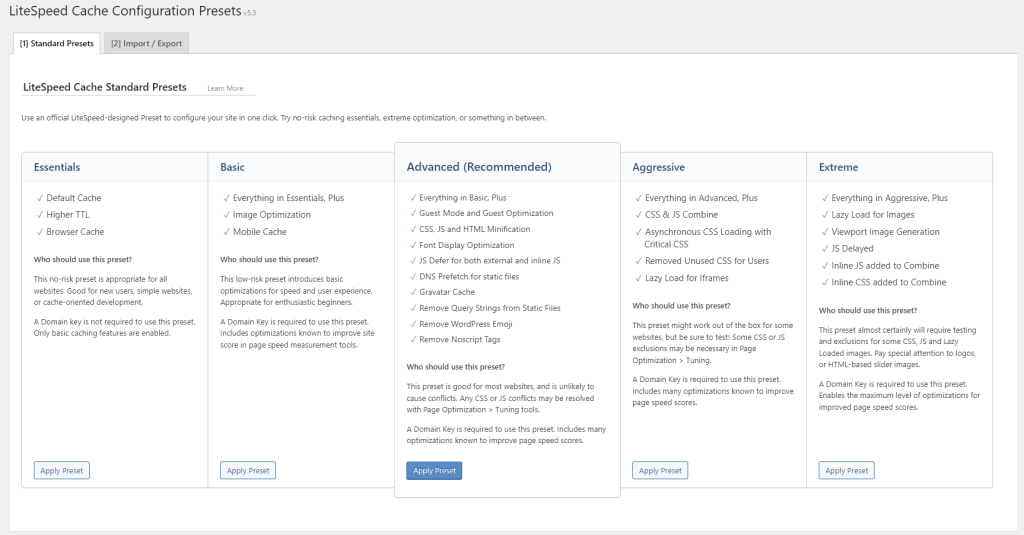
Introducing LSCache Presets for WordPress: the easiest way to optimize your WordPress site using the Litespeed Cache plugin.
Litespeed Cache Presets are a pre-tuned set of options, which can be used for optimizing any WordPress site using Litespeed Cache. You can configure your ideal level of optimization with just a few clicks!
How to use a LiteSpeed Cache preset

In the WordPress Dashboard, you can find Presets under the LiteSpeed Cache menu. If you don’t see it, make sure you’re using v5.3 or higher of the plugin.
To use a preset, press the appropriate Apply Preset button on the Standard Presets tab, and answer OK when prompted to continue. Your old settings will be backed up, and the new preset settings will be applied.
Be sure to test your site and make sure everything is working as expected. This is especially important if you’ve chosen one of the more aggressive presets. If the settings in the preset causes a problem for your site, you can revert back to your previous settings via the History section at the bottom of the tab.
How to revert back
The History section appears on the Standard Presets tab if you have previously applied a preset. Every time you apply a preset, a new entry is added to the history, along with a link that will allow you to revert back to the previous settings.
Simply click the link, and everything will return to the way it once was.
How to choose a preset
Presets are listed in order of risk and skill level. If you are new to caching, and you prefer to “set it and forget it” then stick with Essentials or Basic. On the other hand, if you are a seasoned pro, or you’re an adventurous tinkerer, you might want to try one of the presets at the end of the list.
Here is a basic overview of the official LiteSpeed preset collection. (You can take a look at our presets documentation, if you’d like the full details for each preset.)
Essentials
This preset enables caching, sets a higher default TTL (time to live) , and enables browser cache. These are easy, low-risk ways to improve your site’s loading time.
Essentials will never break your site’s formatting, and will not require any tweaking whatsoever. Even if (or, maybe, especially if) you have no experience with caching, you can apply this preset with confidence.
Basic
Basic enables everything that Essentials does, but it adds image optimization to speed up image loading time, and mobile cache to allow you to cache a mobile version of your website that may be different from the desktop version.
This preset is appropriate for enthusiastic beginners who want to ease into a basic level of optimization. You shouldn’t have to make any adjustments to your settings in order to make this work. Image optimization is a QUIC.cloud service, so you will need a domain key in order to make this work. If you don’t have one, the plugin will prompt you and show you how to get one. The domain key and the image optimization service are both free.
Advanced
Here’s where things start to get more complicated. Advanced enables everything in Basic, and then adds a large number of page optimization features. While this plugin potentially requires some maintenance from you, it has the potential to greatly improve your site’s page speed score.
Page optimization features sometimes highlight incompatibilities among CSS or Javascript used on your site. The incompatible files need to be excluded from optimization. If you enable this preset, you should be comfortable setting up CSS or JS exclusions via the plugin admin.
A domain key is required.
Aggressive
Added to the Advanced features are CSS and JS Combine, Critical CSS, Unique CSS and more. CCSS and UCSS are both QUIC.cloud services which may incur fees, and domain key is required.
These features are excellent for page speed scores, and they really speed up your site. But they also have considerable potential to require intervention. Only use this preset if you are comfortable looking for conflicts and excluding files from optimization.
Extreme
As you might expect from a preset called Extreme, this one enables the maximum level of optimization possible. Page speed sites love sites with all of these optimizations.
As with previous presets, a domain key is required, as is some expertise. These settings are likely to introduce CSS or JS conflicts, especially if you have a lot of plugins or a complicated theme.
Frequently Asked Questions
I am new to Litespeed Cache, which preset should I apply?
We suggest trying the Advanced preset because it takes a balanced approach to optimization and speed. You shouldn’t need to manually tweak many settings, but if you do experience difficulty, you can always revert to your previous settings, or try the Basic preset.
Can I modify Litespeed Cache settings after setting up this preset?
Yes, it is absolutely possible to edit any options after applying a preset. Presets are just an easy way to get started. They give you a good base optimization to start with, but many complex websites will need more fine-tuning to achieve their best possible page score or user experience.
If I don’t like a preset I’ve applied, can I undo it?
Yes! Please see How to revert back above.
Conclusion
These Standard Presets, which were developed by our LiteSpeed team, provide a simple way to apply preconfigured optimization settings for every comfort level. But this is just a start! Eventually, we hope to include Presets that have been submitted by members of our community to cover a wide variety of site styles and needs.
In the meantime, give our Standard Presets a try, and let us know what you think!


